HVAC Inspection Checklist (Free PDF)
Get the free HVAC Inspection Checklist (PDF)
Thanks! Your checklist is ready.
Download the HVAC Inspection ChecklistTable of Contents
An HVAC inspection checklist walks through every part of a heating and cooling system, from the furnace or heat pump to the ducts, thermostat, wiring and safety devices, so problems are caught before they turn into a breakdown on the coldest night or the hottest afternoon. Use the checklist below to know what a thorough inspection covers, what you can check yourself, and what should be left to a licensed technician. In San Jose and the South Bay, where many furnaces sit in attics and AC runs hardest in late-summer heat waves, an annual inspection is the simplest way to keep a system safe and efficient.
The checklist also gives you a record: what was checked, what was found and what was fixed, year after year. That record shows early signs of wear, airflow problems or electrical faults, and makes repair-or-replace decisions easier.
Why Is an HVAC Inspection Checklist Important?
A checklist keeps an inspection complete. Small problems with airflow, heating, cooling or wiring are cheap to fix when they’re found early and expensive when they cause a breakdown. Regular inspections also help hold down energy bills and extend the system’s life, and organized notes make it easier to plan service and budget for replacement.
Benefits of using an HVAC inspection checklist:
- Every component gets checked, nothing skipped
- Better heating and cooling performance
- Fewer avoidable repairs
- Consistent maintenance records
- A more reliable system through the year
What Are the Components of the HVAC Inspection Checklist?
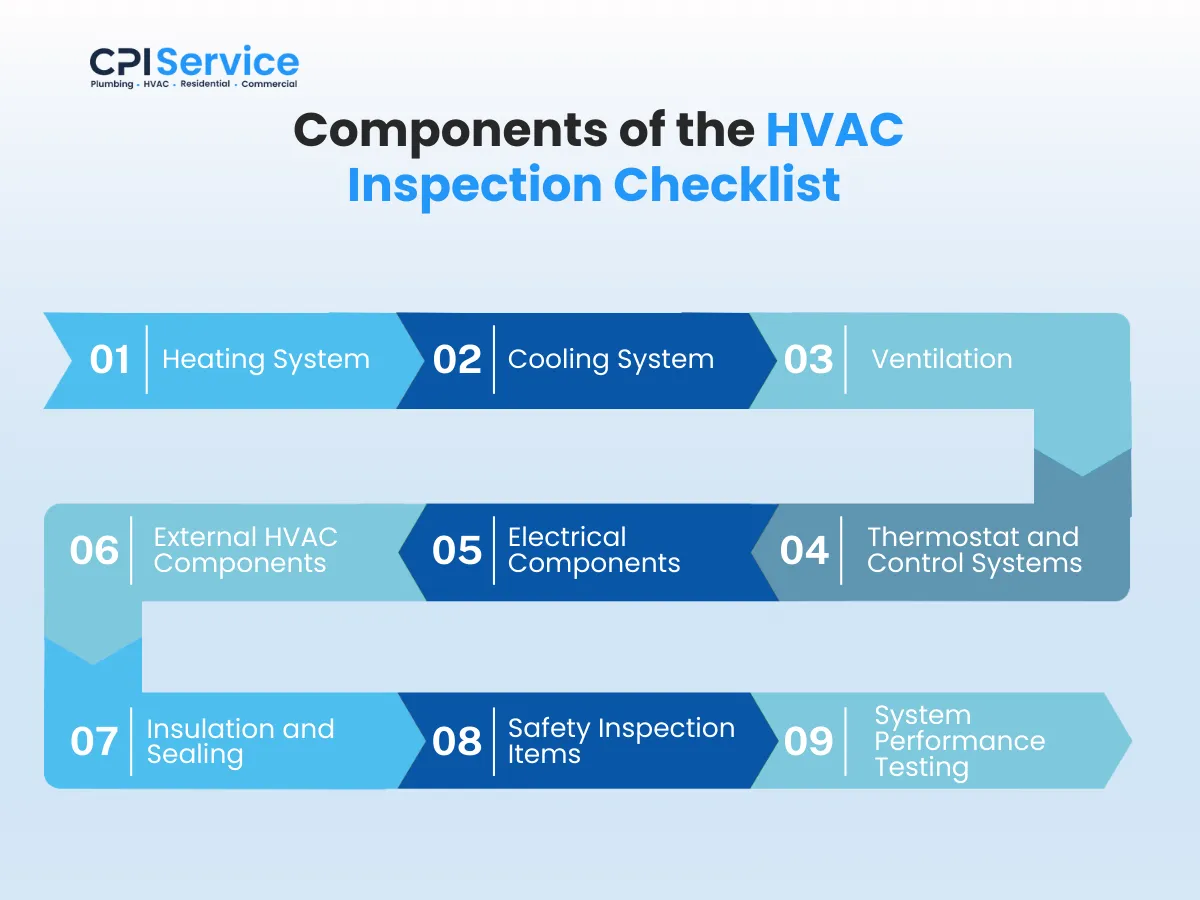
A complete checklist covers nine areas: heating, cooling, ventilation, the thermostat and controls, electrical components, outdoor equipment, insulation and sealing, safety, and performance testing. Items marked technician involve gas, electrical, refrigerant or combustion work and should be done by a licensed HVAC technician.
1. Heating System
The heating section covers the furnace, heat pump or boiler: how well it starts, heats and distributes warm air, and whether its safety controls work.
Gas Furnace (technician)
- Check the air filter and replace it if it’s dirty (you can do this)
- Inspect burners for corrosion, debris and an even blue flame
- Test the igniter and clean or test the flame sensor (see how to clean a flame sensor)
- Inspect the heat exchanger for cracks or corrosion
- Check gas connections and the gas valve for leaks
- Check the venting (flue) for blockages, corrosion and proper draft
- Check the blower for even heat distribution
- Test the limit and pressure switches and the flame sensor’s safety shutdown
Heat Pump, Heating Mode (technician)
- Clear leaves and debris from the outdoor unit (you can do this, with the power off)
- Inspect the indoor and outdoor coils for dirt and ice buildup
- Check the refrigerant charge and look for leaks
- Test the reversing valve and the defrost cycle
- Check duct connections for leaks
- Check the outdoor fan and electrical connections
- Lubricate motors and check belts, only where the unit has oil ports or a belt (most newer motors are sealed)
- Clear the condensate drain
- Confirm the system responds correctly to the thermostat
Boiler, If You Have One (technician)
- Check system pressure and temperature against the manufacturer’s range
- Test the pressure relief valve
- Check the expansion tank, pipes and connections for leaks or corrosion
- Confirm combustion air supply and a clear exhaust vent and flue
- Make sure a carbon monoxide alarm is installed nearby
2. Cooling System
The cooling inspection makes sure the system removes heat efficiently, has the right refrigerant charge and drains its condensate. With regular maintenance, a central air conditioner typically lasts 15 to 20 years; see how long air conditioners last.
Central Air Conditioner (technician)
- Clean or inspect the outdoor condenser coil
- Inspect the indoor evaporator coil and clean it if dirty
- Check the refrigerant charge (a low charge means a leak to find and repair, not a routine top-off)
- Test the capacitor, contactor and condenser fan motor
- Clean the blower wheel and check the motor
- Check the expansion valve (TXV) is metering refrigerant correctly
- Clear and test the condensate drain and pan
You can check: the filter, that the outdoor unit has about 2 feet of clearance, that the thermostat is set correctly, and that the condensate line isn’t dripping or backed up.
Heat Pump, Cooling Mode (technician)
- Clean the outdoor coil and the indoor coil
- Check that the compressor runs and cycles normally
- Check the charge and the expansion valve
- Inspect the accumulator for damage or oil residue (a sign of a leak)
- Confirm the system switches to cooling and follows the thermostat
Ductless, Evaporative and Other Cooling Systems
- Ductless mini-splits: clean the indoor unit’s filters (you can do this); a technician checks the coils, refrigerant lines and insulation, and the condensate drain
- Evaporative (swamp) coolers: check pads, water distribution, the pump and the drain
- Geothermal systems: a technician checks the ground loop pump, circulation and pressures
- Any system: listen for unusual fan or motor noise or vibration, and look for rust, damage or stains on coils and pipes
3. Ventilation and Ductwork
Ducts, blowers and exhaust fans carry conditioned air through the house and stale air out. Leaks, blockages and dirt waste energy and hurt indoor air quality.
Ductwork
- Look for disconnected, crushed or torn ducts (attics and crawl spaces)
- Check that joints and seams are sealed with mastic or approved tape, not failing cloth tape
- Check duct insulation in unconditioned spaces: dry and intact
- Look for signs of pests: droppings, chewing or nesting
- Check inside the ducts at registers for heavy debris or mold
- Make sure ducts are supported and not sagging
Air Distribution and Blower (technician)
- Check the blower motor’s amp draw and bearings
- Clean the blower wheel
- Check that fan speeds deliver the right airflow for heating and cooling
- Check the belt tension, if the blower has a belt
- Seal leaks at plenums and duct transitions
- Make sure supply vents and return grilles are clean and unblocked (you can do this)
Ventilation and Indoor Air Quality
- Make sure the filter fits its slot fully, with no gaps for air to bypass it
- Check any fresh-air intake for blockages, and that its damper opens and closes
- Check humidifiers and air cleaners: clean, draining and free of standing water
- Clean the coil and drain pan to prevent mold growth
- Check the condensate drain and trap for proper drainage
Exhaust and Fresh Air
- Test bathroom exhaust fans and the kitchen range hood: they should pull air and vent outdoors, not into the attic
- Make sure fresh air intakes are away from exhaust outlets, the dryer vent and the driveway
- Check bird screens and vent caps for blockage
- Make sure return air can flow back freely (doors closed shouldn’t starve a room)
- Check that exhaust terminations discharge clear of windows and intakes; California’s Mechanical Code sets these rules for new work
4. Thermostat and Controls
The thermostat controls the whole system, so its placement, accuracy and wiring matter.
- Make sure the thermostat isn’t in direct sun, a draft, or near a heat source or appliance that skews its reading
- Compare its reading with a separate thermometer over 15 to 20 minutes
- Confirm the system responds when you change modes and temperatures
- Replace batteries when it warns they’re low, or on the manufacturer’s schedule
- Check wiring and, for smart thermostats, Wi-Fi and schedules
- Calibration and cleaning inside the thermostat follow the manufacturer’s manual (technician)
See thermostat replacement if yours is unreliable.
5. Electrical Components (technician)
Electrical checks keep power reaching the blower and compressor safely, prevent overloads and make sure the system starts and stops correctly. This work must be done with the power off and follows the California Electrical Code.
- Turn off power at the breaker and the outdoor disconnect before any work
- Inspect wiring for wear, corrosion or overheating, and tighten connections
- Test capacitors, contactors and relays
- Measure voltage and amp draw on the blower and compressor motors
- Check that fuses and breakers are the correct size
- Check the control board for fault codes
- Test safety controls and limit switches
- Confirm the system starts and shuts down correctly on thermostat calls
6. External HVAC Components
The outdoor unit sits in sun, dust and rain all year.
- Clear leaves, weeds and debris from around the unit (you can do this)
- Clean the condenser coil (technician, or carefully with the power off and a garden hose)
- Inspect refrigerant lines for damage and oil spots at fittings, a sign of a leak
- Check that the line insulation is intact
- Check that the unit sits level on its pad
- Look for damage to the fan guard, cabinet or fins
- Keep the clearance the manufacturer requires on all sides
7. Insulation and Air Sealing
Gaps and thin insulation let conditioned air escape, making the system run longer and rooms uneven.
- Check attic, crawl space and basement insulation
- Look for air leaks around walls, ceilings and pipe, wire and duct penetrations
- Seal gaps around ducts, registers and the attic hatch
- Check for loose or disconnected ducts leaking into the attic
- Check weatherstripping and seals on doors and windows
8. Safety Inspection Items
- Carbon monoxide alarms: California requires them in homes with gas appliances, a fireplace or an attached garage; test them and replace batteries
- Gas shutoff: know where the shutoff valve is and keep it reachable
- Gas lines: check for leaks, corrosion or loose fittings at the furnace and appliance connections (technician). If you ever smell gas, leave and call 911 and PG&E from outside
- Combustion and venting: confirm the flue is clear and exhaust leaves the home properly (technician)
- Combustion air: make sure the furnace and water heater get enough air (technician)
- Clearances: keep storage away from the furnace and water heater
- Safety switches: test limit, rollout and float switches (technician)
9. System Performance Testing (technician)
The last step checks how the whole system performs under normal use.
Heating Performance
- The house reaches the set temperature in reasonable time and holds it
- Heat is even across rooms; note any that stay cold
- No delays or short cycling
- Normal behavior under long run times
Cooling Performance
- Measure the temperature difference between return and supply air
- Cooling is even across rooms
- No excessive run time or frequent on-off cycling
- Measure amp draw on the compressor and fan motors
Ventilation Performance
- Steady airflow at supply registers and returns
- No pressure imbalances (doors slamming, whistling, rooms that won’t cool)
- Air circulates evenly through the house
Best Practices for Using the HVAC Inspection Checklist
- Safety first. Turn off power before opening any panel, and leave gas, electrical and refrigerant work to a licensed technician.
- Do the homeowner checks monthly during heavy-use seasons: filter, thermostat, vents, outdoor unit, drain line, CO alarms.
- Keep the manual handy for each piece of equipment, and follow its maintenance schedule.
- Go in order through heating, cooling and ventilation, indoor and outdoor, without skipping steps.
- Keep notes. Record dates, filter changes and anything the technician found, including small things that don’t affect operation yet; it helps with warranty claims and repair decisions.
- Update the checklist when equipment is added or replaced.
- Book a professional inspection once a year. CPI’s membership plans include annual HVAC maintenance for one system, scheduled off-season.
For typical costs, see AC tune-up cost, AC repair cost and furnace repair cost, and for what a plan covers, HVAC maintenance plans.
Ensure a Licensed Contractor Follows the Checklist
The technician items on this list involve gas, high voltage, refrigerant and combustion safety. A licensed HVAC contractor has the training, tools and experience to test them safely, measure what a homeowner can’t (refrigerant charge, amp draw, combustion and draft), and catch hazards like a cracked heat exchanger or a failing vent before they become dangerous. Refrigerant work also requires EPA certification. A professional inspection keeps the system safe and efficient and helps avoid breakdowns in peak season.
HVAC Inspections in San Jose Homes
- Attic furnaces and ducts. Many South Bay homes have the furnace, coil and ducts in the attic, where disconnected ducts and dirty filters go unnoticed.
- Dusty summers. Dry-season dust and pollen coat outdoor coils and filters.
- Heat pumps. More San Jose homes now heat and cool with heat pumps, which run year-round and benefit even more from annual inspection.
CPI Service inspects and maintains HVAC systems throughout San Jose and the South Bay. Schedule HVAC service, request a free estimate or call (408) 978-3093.
Frequently Asked Questions
How often should an HVAC system be inspected?
Once a year for each system. A furnace is best checked in fall and an air conditioner in spring; a heat pump, which heats and cools, benefits from an annual visit before its busiest season.
What's the difference between an HVAC inspection and maintenance?
An inspection checks the condition and safety of the system and notes problems. Maintenance (a tune-up) adds the cleaning and adjustments, such as cleaning the outdoor coil and checking the refrigerant charge. Most annual visits combine both.
Which items can I check myself?
The filter, the thermostat, the vents and returns, the outdoor unit's clearance, the condensate drain line, and your carbon monoxide alarms. Gas, electrical, refrigerant and combustion checks are for a licensed technician.
Our new heat pump system has just been installed and we are very pleased with CPI and the new equipment. We are especially grateful for the knowledgeable and hard-working technician Bunhak, who worked throughout our recent heatwave to finish the job. We would highly recommend CPI for any HVAC installation or maintenance.
Linda G., Google review
Read more reviews →Serving San Jose and the South Bay
CPI Service is based at 2880 Aiello Dr in San Jose and serves homes and businesses across the South Bay and the Peninsula. See all the areas we serve.